November 13, 2020

If you’re a wedding photography who doesn’t love shooting with flash, one of the main reasons why is likely that the setup of all the extra gear slows you down. And while some gear will make your life easier than others, today I want to outline a few wedding Flash tips that let me do some amazing things without my gear slowing me down!
Before we dive in: if you haven’t yet registered for our upcoming FREE Flash Webinar, click the link below to claim your spot:

Wedding Flash Tip #1: Pre-Wedding Setup
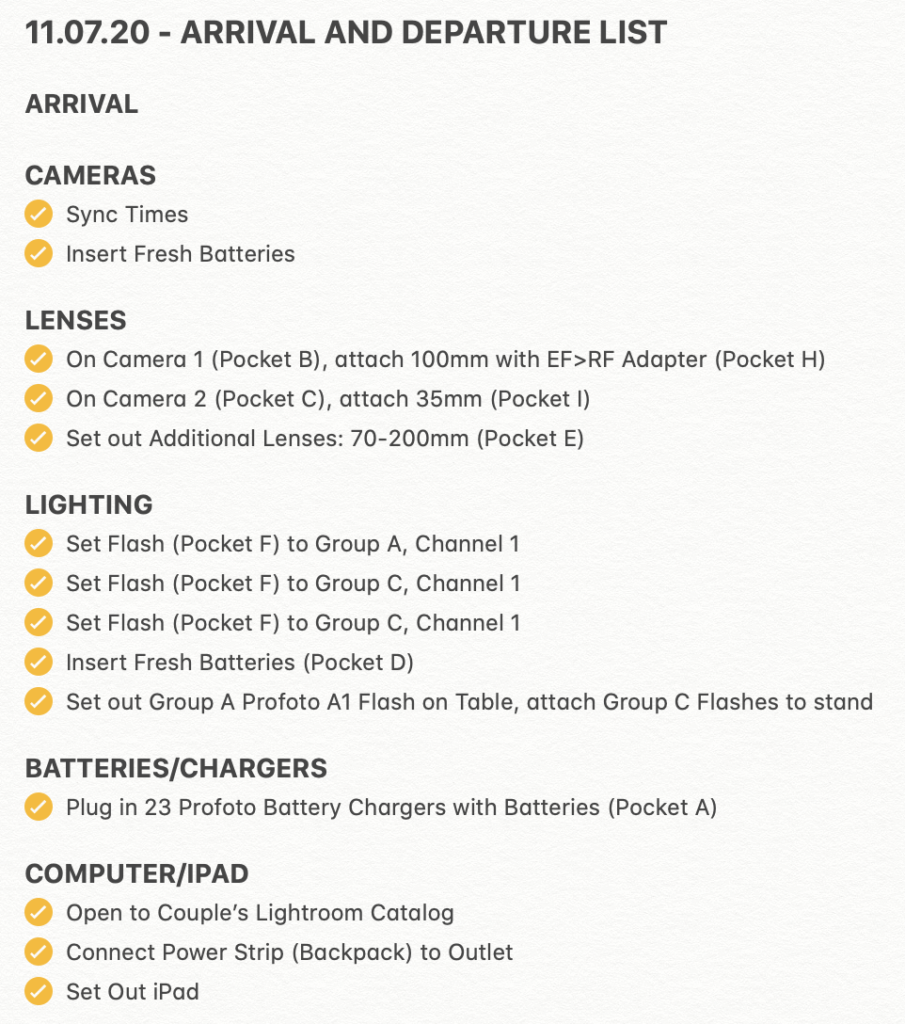
This first wedding Flash tip is also by far the biggest one. This tip is all about setting yourself up for success right out of the gate. When our team arrives at a wedding, I have an arrival and departure checklist. We check off every item before we shoot. Here’s a little sample of a list from one of our recent weddings:

Notice the largest section is dedicated to lighting. All of our flashes are set up and ready to go before we ever take our first shot… hours before we need them!
Why this Helps:
Setting up gear takes time. You can either spend that time later in the day, when you’re rushing from family photos or portraits to the reception, or you can spend that time when you’ve got plenty of it… at the start of the day! Having your gear ready to go when needed will take a lot of stress out of the process!
Wedding Flash Tip #2: Second Shooters and Family Photos
While I’m taking family photos, I love to have my second shooter take the flash stand(s) that we set up pre-wedding and set them up in the reception space. Flying solo? No problem! When you’re mapping out your timeline for the day, hopefully you’re already building in time between the end of pre-wedding photos and the start of the ceremony (I recommend 45 minutes – we use this time to capture reception details and prep for the ceremony). Take the first 5 minutes of this window to set up your flashes. Not only will it save you time when the reception starts, it will also allow you an extra lighting option for your reception details!
Why this Helps:
Time is typically tight post-ceremony. The gap between sunset photos and reception entrance is usually only about as long as it takes to bustle the bride’s dress. Having our flash stands already set up, and the flashes powered on, puts minutes back in my day that allows me to focus on nailing entry and first dance photos!

Wedding Flash Tip #3: End of Reception
One of the hardest, but most important reception shots to nail is the exit shot. If you’re anything like me when I was starting out, this shot probably feels rushed and panicky! It doesn’t have to be this way! For most receptions, the final 15 minutes of dancing tends to leave things winding down. The crowd has thinned a bit, the alcohol consumption has left people looking a little less photogenic than at the start of the night, and the likelihood of capturing a fresh, new addition to the wedding gallery is relatively low. Use this time to your advantage! If you’re shooting with just one flash, head on out and take a few practice shots to test your lighting! If you’re shooting with a multi-flash setup, move your stands outside (moving slowly? these flash stands will speed this process up for you!) and get things setup at a pace you can manage!
Why this Helps:
If there’s any one shot that ranks at the top of my “difficult to nail” list, it’s the exit shot. It’s hard to practice for, and you typically only get one shot at it. By the time you realize you’ve done something wrong, everyone’s already packing up and heading home! Do yourself a favor and leave time for practice reps! I’ll be talking more about this in Monday’s blog post, 5 Tips for Nailing the Perfect Exit Shot!
Site Design by Square 8 Studio
OUR ADDRESS
3000 S Hulen Street
Suite 124-791
Fort Worth, TX 76109
QUICK LINKS
NEW!
FOUR COURSES TO CHOOSE FROM
Learn More
LOG IN
Enrolled in our Courses?
Square 8 Studio is a Fort Worth College & Sorority Photography company serving college students at TCU and SMU.
Privacy Policy
Terms & Conditions
